Ducati 250 Desmo Rebuild

Great stuff ebbo....:clap

When you started this I really thought that you had your work cut out, but it's now all coming together nicely.

Very well done Sir......:thumb2

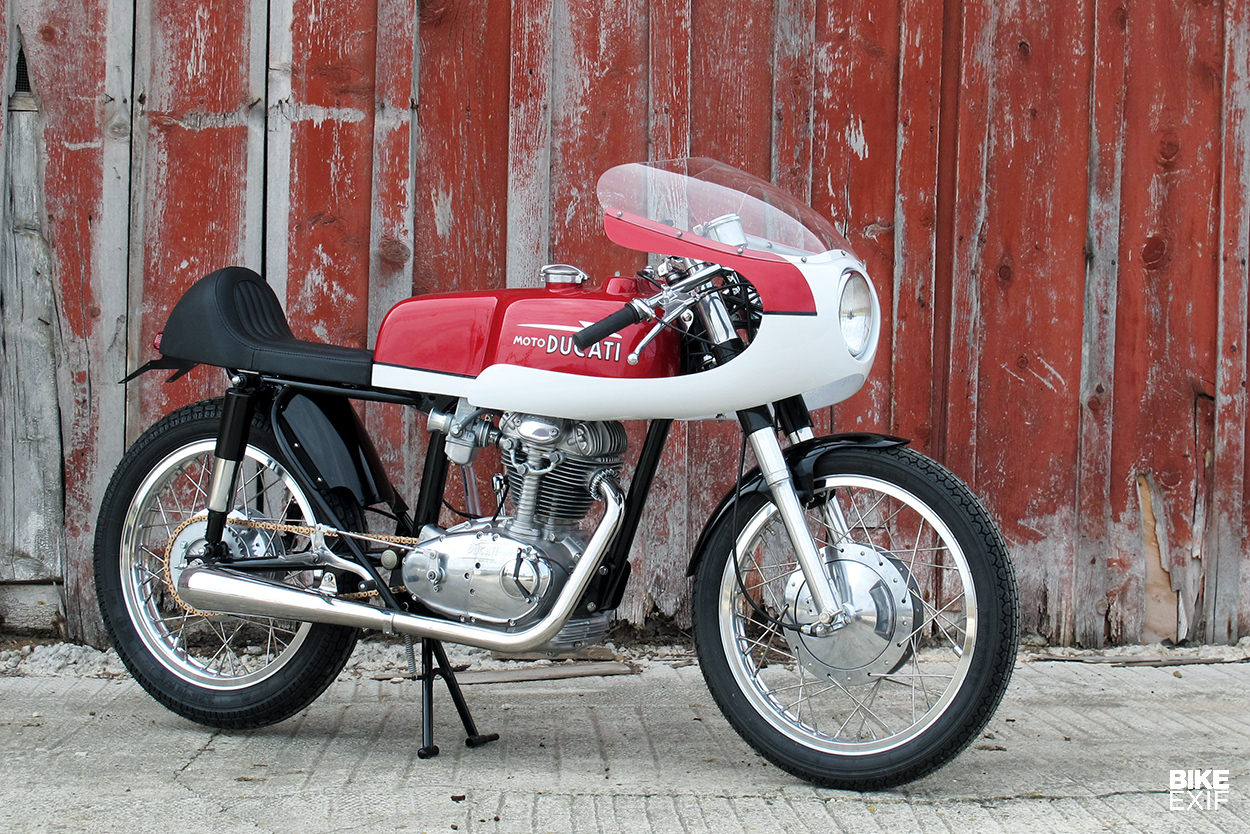
Thank you, but still lots to do Jonnie, wheels, engine, paint, electrics and know doubt a dozen other things I haven’t thought about.
 
I’ve just done my Suzuki Kettle forks.
Remove the clamp bolts and wedge the yoke clamps with a flat screwdriver blade. It won’t need to be knocked in very hard so be careful (of course). Put the blade parallel to fork leg so don’t risk catching the chrome.

I don’t want to knock a pair of screwdrivers in just yet. The yokes have been blasted pre powder coating and this has roughened the alloy, I’m thinking of smoothing it down with fine emery and see if that will do it :thumb2

After that I’ll get the screwdrivers and hammer out lol
 
Quick update:

Firstly, the wheels have gone in to Roy Thursby for relacing and refurbishment but he's a busy boy and I'm not absolutely sure when I'm getting them back, could be over a month. I should have done it sooner.

Receive my 'Age Certificate' from Peter at the Ducati owners club. You need this to register the bike be it a new age related registration (V55/5) or to retain the original registration number (V55/5 & V765) they need a picture of the bike complete and supporting evidence like an old tax disc etc which I don't have so I might have to have a new age related registration, we'll have to wait and see.
 
Quick update:
Receive my 'Age Certificate' from Peter at the Ducati owners club. You need this to register the bike be it a new age related registration (V55/5) or to retain the original registration number (V55/5 & V765) they need a picture of the bike complete and supporting evidence like an old tax disc etc which I don't have so I might have to have a new age related registration, we'll have to wait and see.

Well my original 1970's Lewis Leathers jacket still fits so I could send you a mug shot of me with it on to photoshop onto an image of the bike - unlike the jacket I look old enough to be the original owner ...:rob:rob:rob

Simon
 
Well my original 1970's Lewis Leathers jacket still fits so I could send you a mug shot of me with it on to photoshop onto an image of the bike - unlike the jacket I look old enough to be the original owner ...:rob:rob:rob

Simon
Thanks for the kind offer Simon but that probably won’t cut it :D

Think I’ll wait till it’s more together and take a picture of it then, keeping its original reg would be the ideal but it’s not a show stopper.
 
Did a job tonight I'd been putting off for weeks. Drilling out the broken bleed nipple in one of the caliper half's. Internet said the drill size was 5.2mm but the drill when it came was too tight to go down the hole in the good caliper half so last night I carefully ground it down on a stone till it slipped into the hole.

Tonight with the aid of the wife to sight vertical I drilled down, nice sharp drill btw, I stopped just before the tape mark on the drill then tapped out the tiny stub of the nipple with a piece of stiff wire from the inside,

Good job I stopped when I did, there's very little left of the nipple
 

Attachments

  • Base of old blead nipple.jpg
    Base of old blead nipple.jpg
    131.3 KB · Views: 435
The threads cleaned up real easy with a 6mm bottoming tap, threads look good, think I've got away with it, hurrah!!

Must put that master cylinder back together now!
 

Attachments

  • caliper half after drilling out.jpg
    caliper half after drilling out.jpg
    153.9 KB · Views: 413
  • drill and tap.jpg
    drill and tap.jpg
    191.3 KB · Views: 440
The threads cleaned up real easy with a 6mm bottoming tap, threads look good, think I've got away with it, hurrah!!

Must put that master cylinder back together now!

That's a real win is that! I once managed to drill out an exhaust stud on an oil head BMW with a pistol drill with the engine in situ. By absolute luck I managed to track it perfectly and pull out what was left of the thread like a spring.

Take every win like that and remember them, the slip ups can easily over shadow them ;)

Too true Chris
 
Thought you might like to see this link Ebbo,good luck with the build

http://www.bikeexif.com/ducati-250-cafe-racer

Kimbo :thumb2

That is a very pretty bike :thumb2

ducati-250-cafe-racer.jpg
 
Have you assembled the forks to the yokes yet.

I have just done this for the Montesa that I am currently building.

Top Tip

The yokes are alloy, and have been vapour blasted (Glass bead + water). I did not want to bang screwdrivers in the slits, having spent hours filing, emerying out previous bodgers bruising of the alloy.

I used a hot air gun to heat up the yoke and the stanchion just slipped in. (When the yoke was cold the stanchion would not start, heating up made the job so easy. No mechanical bashing required).
 
That's a real win is that! I once managed to drill out an exhaust stud on an oil head BMW with a pistol drill with the engine in situ. By absolute luck I managed to track it perfectly and pull out what was left of the thread like a spring.

Take every win like that and remember them, the slip ups can easily over shadow them ;)

Brings back painful memories of my Laverda back in '79. I manage to break the drill bit inside the nipple - I sold the bike in the end ...

Keep up the good work!

Simon
 
Have you assembled the forks to the yokes yet.

I have just done this for the Montesa that I am currently building.

Top Tip

The yokes are alloy, and have been vapour blasted (Glass bead + water). I did not want to bang screwdrivers in the slits, having spent hours filing, emerying out previous bodgers bruising of the alloy.

I used a hot air gun to heat up the yoke and the stanchion just slipped in. (When the yoke was cold the stanchion would not start, heating up made the job so easy. No mechanical bashing required).

That's a good idea Dr. My yokes had been blasted and the surfaces roughed up, all I had to do was lightly run around them with fine wet & dry paper and the legs slipped in. pictures and notes to follow.


Brings back painful memories of my Laverda back in '79. I manage to break the drill bit inside the nipple - I sold the bike in the end ...

Keep up the good work!

Simon

I never gave it a thought the drill might snap, it could have snagged and snapped but it just drilled down very straight. It was good to see signs of the threads evenly around the inside of the hole as the drill went down.


Orderd another heap of parts last night to service the caliper :thumb2
 
More brake success today with the master cylinder basically rebuilt.

The master cylinder had come back a while ago and the sleeve it had had fitted was perfect, now it was time to refit the piston assembly. Good job I'd kept the original parts as they'd dropped out or I'd have no idea the order they go back, the Brembo instruction sheet that came with the service kit was totally useless. Most important to note is it's the last metal ring (red arrow) around the rubber seal that holds the assembly in place, rather obvious now but not at the time. It was tapped into place with an extra deep 14mm socket which was perfect for the job.
 

Attachments

  • Piston layout.jpg
    Piston layout.jpg
    185.7 KB · Views: 560
  • Piston refitted.jpg
    Piston refitted.jpg
    152.4 KB · Views: 555
The Brembo brake caliper is back together, but first let's remind ourselves how it look at Christmas :eek:
 

Attachments

  • 07 How it started.jpg
    07 How it started.jpg
    184.4 KB · Views: 465
The caliper halves were washed, scoured with old green kitchen scourer and washed again and again. The main seal beds were scrapped out with broken pieces of tooth pick (quite a bit of unseen crud came out)
 

Attachments

  • 01 scraping out the seal beds.jpg
    01 scraping out the seal beds.jpg
    178.8 KB · Views: 496


Back
Top Bottom