sykospain
Registered user
Having just this last fortnight done two clutch jobs on R1150 bikes, I thought I'd write up a Step-By-Step before my old noddle forgot what I did. Especially with the ABS-equipped GSA.
I'd searched the web for How-To videos for this job, but the only really detailed video is the famous and thankfully now revitalised and relocated Chris Harris one, at 2 hours duration, doing the job on a cable-operated clutch, where the process of tear-down prior to pulling back the complete tranny as a unit, is slightly different to that required for a hydraulically-actuated clutch bike with ABS.
Any comments / pointing out things I forgot, would be most welcome from those who really know...
Maybe the following tome could be of help for someone contemplating tearing into their bike to examine / refurb the clutch and its hydraulic actuation.
"BMW R1150 with ABS – Clutch Access Procedure
Bike on its side stand – crack the rear wheel’s 4 lug-bolts. They’re Charles Atlas tight at 105Nm dry.
Bike on its Centre Stand – strap it firmly with a cam-lock to the front wheel; now the bike can’t roll forward off its stand.
Remove seats and fuel deposito, along with right-side injector cover held by one forward bolt and one grommet.
Remove battery – negative connector first. Remove the two 10mm washers and nuts in the dished cavities in the bottom of the battery box. The other two hiding beneath the ABS unit are almost totally inaccessible - darn.
Remove Diagnostic Plug and Air Temperature Sensor Plug, both clipped to Air Box Lid, then remove the Lid, Air Inlet Snorkel, and Air Filter.
Remove silencer ( rotted pipe-clamps ? ) and also the left-hand pannier frame if fitted and you're in the habit of frequently banging your bonce as you work.
Follow the Oxygen Sensor cable from the Cat / Y-pipe up to its connector plug near the ABS unit and unplug. Note the cable routing up to its connector and from now onwards, take Very Big Flash Close-Up photographs of everything. Or you’ll forget what goes where when you come to re-assemble the bike.
Remove rear brake caliper with hugger / mud splash guard if fitted.
Remove rear wheel, ( you already cracked those 4 extremely-tight lug bolts, didn’t you ? ) noting that ABS bikes have a thin spacer that tries to either stick to the hub or wheel, or tries to run away. According to the expert "Nord" in Motorworks, originally non-ABS bikes don't have a spacer !
Follow the ABS Cable from its sensor bolted to the Final Drive up towards to its connector zip-tied to the rear frame's top tube on the same side of the bike, and unplug it. There is absolutely no need to remove the sensor unit with its hooked spacers attached to the Final Drive.
Identify the (2) thin cable(s) – stop-light ( and speedometer ? ) – then snip the(ir) zipties and undo the(ir) connector(s) on the rear frame’s top rail on the right-hand-side of the bike.
Remove each foot-peg assembly's 3 fixing bolts each side of the bike and zip-tie the peg kits up. No need to undo gear-shift linkage. Do not disturb ABS pipework by the rear brake cylinder.
Struggle to remove the 14mm nut on the 15mm bolt that fixes the top bush of the shock absorber gas strut & spring unit. Might need to remove any seat-height adjuster kits to accomplish this. Then remove lower shock bolt whilst supporting the swing-arm with a Jacques. Don’t let it fall and cut into the large rubber boot where the shaft unit joins the gearbox.. Remove the suspension adjuster hand-wheel unit with its long connecting cable ( zip-tied ? ) and lift shocker away and out. It’s quite heavy.
Now the Air Box Removal Procedure
Remove the two screws, one each side, hidden behind the cables and tubing just above the Telelever pivot.
And don’t forget the top-rear-edge single screw inside the Air Box.
There is no need to remove the Injector Unit assemblies on each cylinder, because the fuel lines which incorporate the Fuel Pressure Regulator can be de-grommeted from their slot at each side of the top front edge of the Air-Box when it is removed in a few minutes from now. The right-side slot holds a triple composite grommet and the left side slot has a single grommet. Ne perdez pas.
Loosen completely the stainless-steel clamps at each end of the Air Box Inlet Tubes from the Throttle Bodies and struggle to slide them both back into the Air Box. Observe the horizontal line on the Air Inlet Tubes - it's there for a purpose to help you re-install. Here, I swear by a squirt of Surgical Spirit available for flumpence at your local chemist. It's a superb rubber lubricant and leaves no trace whatsoever. In the USA it's called Rubbing Alcohol.
When sliding these tubes back into the Air Box, don't damage the thin rubber-ring seal next to the throttle body on each side of the bike. If that ring is slack, an hour in the freezer brings it back to its senses.
With a strong pair of snip-pinch tongs, destroy the BMW single-use hose clamp securing the Crankcase Fumes Vent Hose attached to the right-hand side of the Air Box at its top front edge. Pull the hose off its stub. You'll need a Jubilee Clip when re-fitting, unless you have access to extras of those single-use crimp-type abrazaderas.
Next, the need to raise the rear frame by pivoting it upwards.
Just above each cylinder, a long transverse bolt has a nut on each end. JUST LOOSEN these two nuts, do not remove them. Just below them is the frame’s forward fixing bolt on each side – very tight indeed, usually factory-thread-locked – remove both. One or other of these may be used to attach the crash-bar kit if fitted. If so, a very long socket extension is needed.
The ABS non-flexing twin-pipes leading to the rear brake are perhaps held to the gearbox on the right-hand side by a plastic double clamp with a single fixing bolt. Remove and store these carefully.
Remove the Starter Motor – no need to disconnect its cables. Cut the zip-tie that may be surrounding it and note the routing of any cables held behind it. To avoid trapping them elsewhere on re-assembly.
Remove the hidden forward-facing bolt holding the end of the ABS pipe banjo just above the rear brake master cylinder bolt. ( Remove any forward-facing frame-securing bolt near this )
Connect a very strong bike-hold-down cam-lock strap between the head-stock and the tail. Now the dexterous multi-taskers among us can gradually raise the tail by lifting the top-box frame or passenger grab-handles, at the same time adjusting and tightening in stages the cam-lock strap. . Whilst doing so, carefully watch out for and clear away any dangling and interfering wires and tubing. See what I mean by multi-taskering ? Snip any zip-ties – BMW loves ‘em ! I counted fifteen by the time disassembly was complete.
When the tail is as high as an elephant’s eye – 45 or 60 degrees - latch the cam-lock strap securely and check it won’t slip and nut you.
Now remove the pesky, troublesome, gold-durned Air-Box, untangling it from wires and tubing as you drop it down, back and away.
Now the irritating Rear Frame Cross Bar.
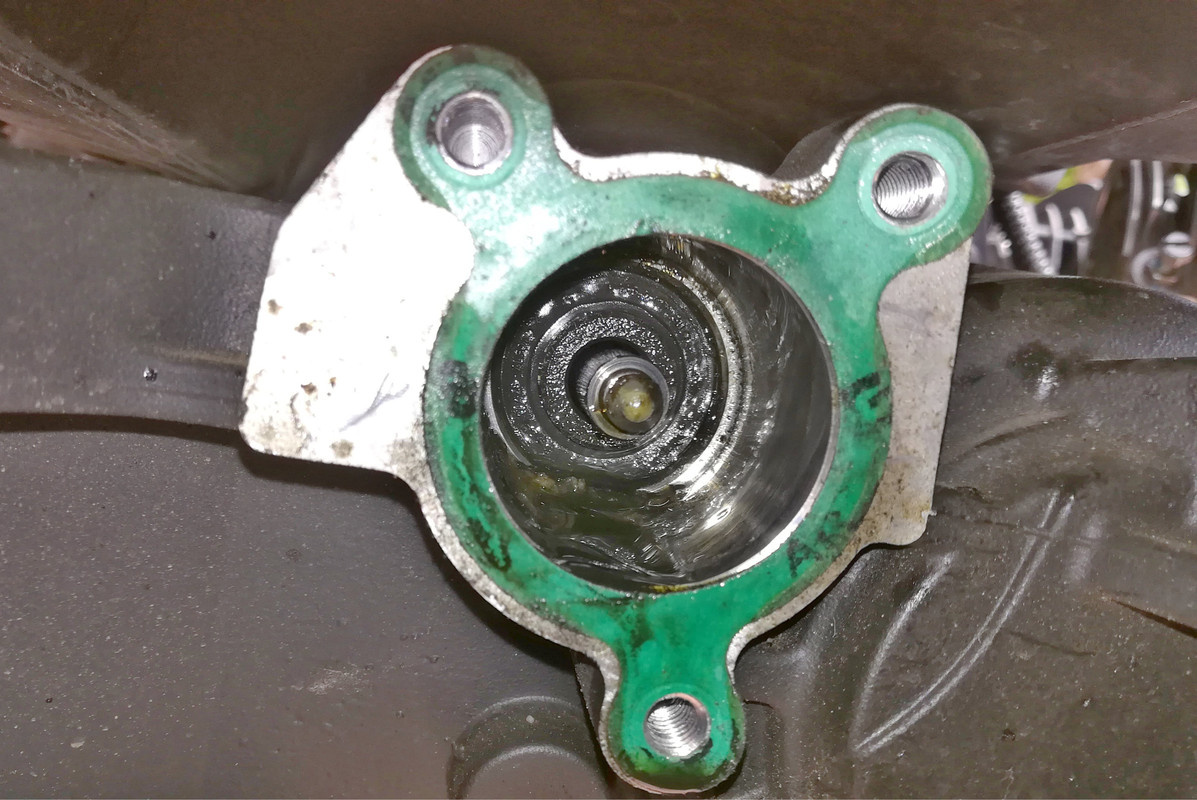
Remove the two forward-facing screws securing the rear-frame-stiffening crossbar at its right-hand end and withdraw it from that side – to reveal the Clutch Slave Cylinder and its 3 fixing bolts, only torqued to 9 Nm. On a bike with more than 20K miles on the clock, this item and its long hose leading to the clutch lever are best renewed, along with the gearbox oil-seal hidden deep inside the Slave Cylinder cavity at the back of the gearbox casting. Seal-picks and an hour's fight are needed if the OEM seal is shot, which it usually is. The stinking juice in there is a cocktail of gearbox oil and DOT4.
After removing the Slave Cylinder and undoing its 2 banjos – new alloy 6mm crush washers are needed with the new unit – it’s as well now to take the short Bleeder Hose to the bench vice, clamping the hex nut just below the black end-fitting - “Werkstück” - heat it gently for a few minutes to soften the factory-applied thread-locker, continuously checking that the plastic hose fitment below stays cool, and replace the useless Werkstück” with a Speed Bleeder – size : 10mm by one. Thereafter, clutch fluid bleeding each birthday is a one-handed job.
Next step is to split the gearbox / transmission / final drive / rear wheel as a single unit away from the bike’s motor crankcase.
But first, withdraw the Clutch Actuation Rod backwards from inside the Slave Cylinder Cavity. If that rod is bent as the transmission is withdrawn from the crankcase, a new rod costs mucho dinero !
Now let’s ask ourselves, which Teutonic tow-rag designed and planned the wiring route running from the Gear Shift Indicator clipped to the back of the gearbox underneath the slave cylinder, up and along to its connecting plug ? Holy Moley, even if you squeeze the two spring prongs holding the indicator in place, so as to free it from the casting, the fecking indicator won't pass through the hole that its wires run through in the gearbox casting, because the a-holes in Berlin-Spandau's casting-design department refrained from making the hole big enough - come to think of it, that's quite unusual for a Berliner who nightclubs..... So you have to unplug the wire at its connector hidden up there behind the thick loom bundle just beneath the battery, then fight to pull the wire and its purple / maroon / reddish coloured connecting plug free, so you can pull back the transmission. On the GSA-ABS, this un-threading procedure took a whole ninety minutes.
Now remove the catalysator box – a 15Kg lump of useless garbage aimed at the Californian market, where any form of breathing is strictly controlled. Again, maybe rotted pipe clamps will hold you up, but the two black countersunk screws that hold the cat's back end to the centre-stand assembly might come out much easier. Remember it’s heavy and don’t rip the Oxygen Sensor wire as you carefully withdraw it.
Now re-fit the rear wheel. No need to strangle the lug-bolts. Yet.
Gently support the gearbox with a trolley jack, remove the six Crankcase Ringer Bolts, carefully noting which of them is extra-long and has a special bracket to hold one or other cables. Photographs please. Replace the top-left and the bottom-right ringer-bolts with 150mm-long headless M8 high-tensile guide-dowels, greased to help the unit to slide back in-line. More if you like – I use four. These guide-pins are igh-tensile long M8 bolts with their heads lobbed off and the end cut across with a screwdriver slot.
UNFORTUNATELY – there is a snag to a smooth pull-back. And I mean SNAG !
At the top-front of the gearbox are two short rubber-cased metal spigots / bolts – those that had the two 10mm nuts holding down the Battery Box. Looped around the LEFT HAND spigot are 2 very thick earthing cables off the loom. That pair must be lifted up over the spigot – if not, the transmission cannot slide backwards away from the engine. A long pry-bar is required. Or an attempt to force the battery box upwards. Or as one correspondent on another forum simply says, lob off that offending left-hand spigot. The other bolt is enough to firmly hold down the battery box.
Now, with the aid of the trolley jacques, not necessarily made in la belle France, the transmission and rear-wheel assembly should slide back on the guide pins away from the crankcase to reveal the clutch and the Gearbox Input Splined Rod.
However, the 2 little dowel-tubes in the crankcase are usually rusted into the bell-housing, especially the one at the bottom right-hand side. So a few hefty whacks with a very heavy lump hammer against a stout wooden pad are needed.
Don't drop the front end of the gearbox when it finally succumbs to your brute force hammering and comes away from the motor casting, because the complete gearbox /shaft / Final Drive / wheel unit is not centrally balanced. It's all very heavy - maybe 60Kg, and wants to tip over to the right because of the imbalance of the shaft and Final Drive.
For Clutch Replacement, see authoritative Chris Harris videos."
That's my sequenced list of jobs for the clutch access on an ABS-equipped bike.
Any comments / suggestions for alterations to the text are most welcome, provided they are in the spirit of helping me and others ! The whole job took 2 hours, plus unfortunately the extra ninety minutes needed to untangle and free the Gearbox Indicator wire from its connector hidden behind the think loom cable on the left-hand side of the bike below the Battery Box.
AL in s.e. Spain
I'd searched the web for How-To videos for this job, but the only really detailed video is the famous and thankfully now revitalised and relocated Chris Harris one, at 2 hours duration, doing the job on a cable-operated clutch, where the process of tear-down prior to pulling back the complete tranny as a unit, is slightly different to that required for a hydraulically-actuated clutch bike with ABS.
Any comments / pointing out things I forgot, would be most welcome from those who really know...
Maybe the following tome could be of help for someone contemplating tearing into their bike to examine / refurb the clutch and its hydraulic actuation.
"BMW R1150 with ABS – Clutch Access Procedure
Bike on its side stand – crack the rear wheel’s 4 lug-bolts. They’re Charles Atlas tight at 105Nm dry.
Bike on its Centre Stand – strap it firmly with a cam-lock to the front wheel; now the bike can’t roll forward off its stand.
Remove seats and fuel deposito, along with right-side injector cover held by one forward bolt and one grommet.
Remove battery – negative connector first. Remove the two 10mm washers and nuts in the dished cavities in the bottom of the battery box. The other two hiding beneath the ABS unit are almost totally inaccessible - darn.
Remove Diagnostic Plug and Air Temperature Sensor Plug, both clipped to Air Box Lid, then remove the Lid, Air Inlet Snorkel, and Air Filter.
Remove silencer ( rotted pipe-clamps ? ) and also the left-hand pannier frame if fitted and you're in the habit of frequently banging your bonce as you work.
Follow the Oxygen Sensor cable from the Cat / Y-pipe up to its connector plug near the ABS unit and unplug. Note the cable routing up to its connector and from now onwards, take Very Big Flash Close-Up photographs of everything. Or you’ll forget what goes where when you come to re-assemble the bike.
Remove rear brake caliper with hugger / mud splash guard if fitted.
Remove rear wheel, ( you already cracked those 4 extremely-tight lug bolts, didn’t you ? ) noting that ABS bikes have a thin spacer that tries to either stick to the hub or wheel, or tries to run away. According to the expert "Nord" in Motorworks, originally non-ABS bikes don't have a spacer !
Follow the ABS Cable from its sensor bolted to the Final Drive up towards to its connector zip-tied to the rear frame's top tube on the same side of the bike, and unplug it. There is absolutely no need to remove the sensor unit with its hooked spacers attached to the Final Drive.
Identify the (2) thin cable(s) – stop-light ( and speedometer ? ) – then snip the(ir) zipties and undo the(ir) connector(s) on the rear frame’s top rail on the right-hand-side of the bike.
Remove each foot-peg assembly's 3 fixing bolts each side of the bike and zip-tie the peg kits up. No need to undo gear-shift linkage. Do not disturb ABS pipework by the rear brake cylinder.
Struggle to remove the 14mm nut on the 15mm bolt that fixes the top bush of the shock absorber gas strut & spring unit. Might need to remove any seat-height adjuster kits to accomplish this. Then remove lower shock bolt whilst supporting the swing-arm with a Jacques. Don’t let it fall and cut into the large rubber boot where the shaft unit joins the gearbox.. Remove the suspension adjuster hand-wheel unit with its long connecting cable ( zip-tied ? ) and lift shocker away and out. It’s quite heavy.
Now the Air Box Removal Procedure
Remove the two screws, one each side, hidden behind the cables and tubing just above the Telelever pivot.
And don’t forget the top-rear-edge single screw inside the Air Box.
There is no need to remove the Injector Unit assemblies on each cylinder, because the fuel lines which incorporate the Fuel Pressure Regulator can be de-grommeted from their slot at each side of the top front edge of the Air-Box when it is removed in a few minutes from now. The right-side slot holds a triple composite grommet and the left side slot has a single grommet. Ne perdez pas.
Loosen completely the stainless-steel clamps at each end of the Air Box Inlet Tubes from the Throttle Bodies and struggle to slide them both back into the Air Box. Observe the horizontal line on the Air Inlet Tubes - it's there for a purpose to help you re-install. Here, I swear by a squirt of Surgical Spirit available for flumpence at your local chemist. It's a superb rubber lubricant and leaves no trace whatsoever. In the USA it's called Rubbing Alcohol.
When sliding these tubes back into the Air Box, don't damage the thin rubber-ring seal next to the throttle body on each side of the bike. If that ring is slack, an hour in the freezer brings it back to its senses.
With a strong pair of snip-pinch tongs, destroy the BMW single-use hose clamp securing the Crankcase Fumes Vent Hose attached to the right-hand side of the Air Box at its top front edge. Pull the hose off its stub. You'll need a Jubilee Clip when re-fitting, unless you have access to extras of those single-use crimp-type abrazaderas.
Next, the need to raise the rear frame by pivoting it upwards.
Just above each cylinder, a long transverse bolt has a nut on each end. JUST LOOSEN these two nuts, do not remove them. Just below them is the frame’s forward fixing bolt on each side – very tight indeed, usually factory-thread-locked – remove both. One or other of these may be used to attach the crash-bar kit if fitted. If so, a very long socket extension is needed.
The ABS non-flexing twin-pipes leading to the rear brake are perhaps held to the gearbox on the right-hand side by a plastic double clamp with a single fixing bolt. Remove and store these carefully.
Remove the Starter Motor – no need to disconnect its cables. Cut the zip-tie that may be surrounding it and note the routing of any cables held behind it. To avoid trapping them elsewhere on re-assembly.
Remove the hidden forward-facing bolt holding the end of the ABS pipe banjo just above the rear brake master cylinder bolt. ( Remove any forward-facing frame-securing bolt near this )
Connect a very strong bike-hold-down cam-lock strap between the head-stock and the tail. Now the dexterous multi-taskers among us can gradually raise the tail by lifting the top-box frame or passenger grab-handles, at the same time adjusting and tightening in stages the cam-lock strap. . Whilst doing so, carefully watch out for and clear away any dangling and interfering wires and tubing. See what I mean by multi-taskering ? Snip any zip-ties – BMW loves ‘em ! I counted fifteen by the time disassembly was complete.
When the tail is as high as an elephant’s eye – 45 or 60 degrees - latch the cam-lock strap securely and check it won’t slip and nut you.
Now remove the pesky, troublesome, gold-durned Air-Box, untangling it from wires and tubing as you drop it down, back and away.
Now the irritating Rear Frame Cross Bar.
Remove the two forward-facing screws securing the rear-frame-stiffening crossbar at its right-hand end and withdraw it from that side – to reveal the Clutch Slave Cylinder and its 3 fixing bolts, only torqued to 9 Nm. On a bike with more than 20K miles on the clock, this item and its long hose leading to the clutch lever are best renewed, along with the gearbox oil-seal hidden deep inside the Slave Cylinder cavity at the back of the gearbox casting. Seal-picks and an hour's fight are needed if the OEM seal is shot, which it usually is. The stinking juice in there is a cocktail of gearbox oil and DOT4.
After removing the Slave Cylinder and undoing its 2 banjos – new alloy 6mm crush washers are needed with the new unit – it’s as well now to take the short Bleeder Hose to the bench vice, clamping the hex nut just below the black end-fitting - “Werkstück” - heat it gently for a few minutes to soften the factory-applied thread-locker, continuously checking that the plastic hose fitment below stays cool, and replace the useless Werkstück” with a Speed Bleeder – size : 10mm by one. Thereafter, clutch fluid bleeding each birthday is a one-handed job.
Next step is to split the gearbox / transmission / final drive / rear wheel as a single unit away from the bike’s motor crankcase.
But first, withdraw the Clutch Actuation Rod backwards from inside the Slave Cylinder Cavity. If that rod is bent as the transmission is withdrawn from the crankcase, a new rod costs mucho dinero !
Now let’s ask ourselves, which Teutonic tow-rag designed and planned the wiring route running from the Gear Shift Indicator clipped to the back of the gearbox underneath the slave cylinder, up and along to its connecting plug ? Holy Moley, even if you squeeze the two spring prongs holding the indicator in place, so as to free it from the casting, the fecking indicator won't pass through the hole that its wires run through in the gearbox casting, because the a-holes in Berlin-Spandau's casting-design department refrained from making the hole big enough - come to think of it, that's quite unusual for a Berliner who nightclubs..... So you have to unplug the wire at its connector hidden up there behind the thick loom bundle just beneath the battery, then fight to pull the wire and its purple / maroon / reddish coloured connecting plug free, so you can pull back the transmission. On the GSA-ABS, this un-threading procedure took a whole ninety minutes.
Now remove the catalysator box – a 15Kg lump of useless garbage aimed at the Californian market, where any form of breathing is strictly controlled. Again, maybe rotted pipe clamps will hold you up, but the two black countersunk screws that hold the cat's back end to the centre-stand assembly might come out much easier. Remember it’s heavy and don’t rip the Oxygen Sensor wire as you carefully withdraw it.
Now re-fit the rear wheel. No need to strangle the lug-bolts. Yet.
Gently support the gearbox with a trolley jack, remove the six Crankcase Ringer Bolts, carefully noting which of them is extra-long and has a special bracket to hold one or other cables. Photographs please. Replace the top-left and the bottom-right ringer-bolts with 150mm-long headless M8 high-tensile guide-dowels, greased to help the unit to slide back in-line. More if you like – I use four. These guide-pins are igh-tensile long M8 bolts with their heads lobbed off and the end cut across with a screwdriver slot.
UNFORTUNATELY – there is a snag to a smooth pull-back. And I mean SNAG !
At the top-front of the gearbox are two short rubber-cased metal spigots / bolts – those that had the two 10mm nuts holding down the Battery Box. Looped around the LEFT HAND spigot are 2 very thick earthing cables off the loom. That pair must be lifted up over the spigot – if not, the transmission cannot slide backwards away from the engine. A long pry-bar is required. Or an attempt to force the battery box upwards. Or as one correspondent on another forum simply says, lob off that offending left-hand spigot. The other bolt is enough to firmly hold down the battery box.
Now, with the aid of the trolley jacques, not necessarily made in la belle France, the transmission and rear-wheel assembly should slide back on the guide pins away from the crankcase to reveal the clutch and the Gearbox Input Splined Rod.
However, the 2 little dowel-tubes in the crankcase are usually rusted into the bell-housing, especially the one at the bottom right-hand side. So a few hefty whacks with a very heavy lump hammer against a stout wooden pad are needed.
Don't drop the front end of the gearbox when it finally succumbs to your brute force hammering and comes away from the motor casting, because the complete gearbox /shaft / Final Drive / wheel unit is not centrally balanced. It's all very heavy - maybe 60Kg, and wants to tip over to the right because of the imbalance of the shaft and Final Drive.
For Clutch Replacement, see authoritative Chris Harris videos."
That's my sequenced list of jobs for the clutch access on an ABS-equipped bike.
Any comments / suggestions for alterations to the text are most welcome, provided they are in the spirit of helping me and others ! The whole job took 2 hours, plus unfortunately the extra ninety minutes needed to untangle and free the Gearbox Indicator wire from its connector hidden behind the think loom cable on the left-hand side of the bike below the Battery Box.
AL in s.e. Spain

 !!!
!!!