

You are using an out of date browser. It may not display this or other websites correctly.
You should upgrade or use an alternative browser.
You should upgrade or use an alternative browser.
Fuel strip to float conversion complete guide.
- Thread starter Denz0
- Start date
Is it possible to use the GS-911 Diagnostic tool instead of the UniCarScan BT Diagnoseadapter to reprogram the ECU ?
I understand that it is not possible at the moment with the GS911 but I have read that it is on the roadmap / list for the future.
I used an OBDLINK-MX+ and MotoScan Ultimate App.
I understand that it is not possible at the moment with the GS911 but I have read that it is on the roadmap / list for the future.
I used an OBDLINK-MX+ and MotoScan Ultimate App.
Managed to fix the fuel strip. This is the forth time the fuel meter stop working, had it replaced in USA three times over the summer 2018. In USA the strip is on extended warranty so free of charge but here in Iceland no extended guaranty.


It would be great if you could publish your video endeavors as well, rough and all as it may be I would appreciate it..... especially if it has "don't do this" advice
I have to do this and swapping around leads on an ECU is not for the faint of heart.
No offence to to OP and other contributors.

I've been inspired by this thread to finally fix the fuel strip. Not concerned about fitting the float but I've struggled in the past with electrical connectors (possibly because I cant fix them with a hammer ha ha)
 - has anyone got any DETAILED pics/video/description of how to take apart the connector & swap the pins over? Might save me making a mess of the job if so....
I've been inspired by this thread to finally fix the fuel strip. Not concerned about fitting the float but I've struggled in the past with electrical connectors (possibly because I cant fix them with a hammer ha ha)
normally each pin is held in place with a little tag or tang that just locks into or behind a small lip in the connector.
normally the way ive removed similar wires in the past is to slide a needle down one side or the other to press the tag in and at the same time just apply tome tension to the wire to ease it out.
You could alliteratively just snip the two existing wires where they enter the connector and make sure they dont touch anything else, and then rewire the now free wired ends to two new pins, and
place them into the appropriate holes in the plug
(if that makes sense)
The connectors are held in place with a little tang, but dismantling the plug took a little more force than I initially expected. Overcoming the waterproof seals.
On hindsight I did not need to dismantle the connectors as much as I did.
It would be good if someone could do a short video of this wire swap procedure as I think that it would be of help to many.
On hindsight I did not need to dismantle the connectors as much as I did.
It would be good if someone could do a short video of this wire swap procedure as I think that it would be of help to many.
The connectors are held in place with a little tang, but dismantling the plug took a little more force than I initially expected. Overcoming the waterproof seals.
On hindsight I did not need to dismantle the connectors as much as I did.
It would be good if someone could do a short video of this wire swap procedure as I think that it would be of help to many.
I'll try to post up some pics when I finally get to the connectors. Interested about your comment that you didn't need to dismantle as much as you did - can you explain a bit more please?
On post #1 on photo 2 it shows the connector removed from the shell and split to remove the blanking plugs. after doing the job I came across another article where they removed the blanking plugs by pushing them out with a wire from the open end without splitting the connector.
I have not done this myself it is an observation. I would try it this way next time.
Not a big difference just less fiddly,
The point where it took more effort to overcome the seals than I expected was removing the connector from the shell. ( It might have been an odd tight one).
It was so tight I was concerned that I had overlooked one of the retaining clips, A reassuring phone call to Denz0 gave me the confidence to use more force.")
I have not done this myself it is an observation. I would try it this way next time.
Not a big difference just less fiddly,
The point where it took more effort to overcome the seals than I expected was removing the connector from the shell. ( It might have been an odd tight one).
It was so tight I was concerned that I had overlooked one of the retaining clips, A reassuring phone call to Denz0 gave me the confidence to use more force.
About 3 years ago, after the fuel strip on my 2010 GSA failed for the nth time I bought a converter module from HPoskam engineering and fitted it in line plus a float. The converter module killed the fuel warning on the dash but the fuel gauge reports about three quarters of a tank full regardless of how full the tank was – I guess I got the float hooked up on the transfer pipe or something when I installed it. I intended to get round to fixing the float but didn’t get round to it…. until being inspired by the excellent post from Denz0 above.
This is what my dash looks like.

Before grappling with the float again I thought I’d fire up the Motoscan app and see what the settings looked like. Even though I have a 2010 GSA with trip computer I don’t see a parameter for INDUCTIVE_FUEL_SENSOR so I guess I have a different ZFE version to the bike Denz0 worked on, which probably means that Denz0’s hack wouldn’t work on my bike anyway? I can see Thermocouples FCS 08 was set to foliengeber so I set it to potentiometer to see what happened.


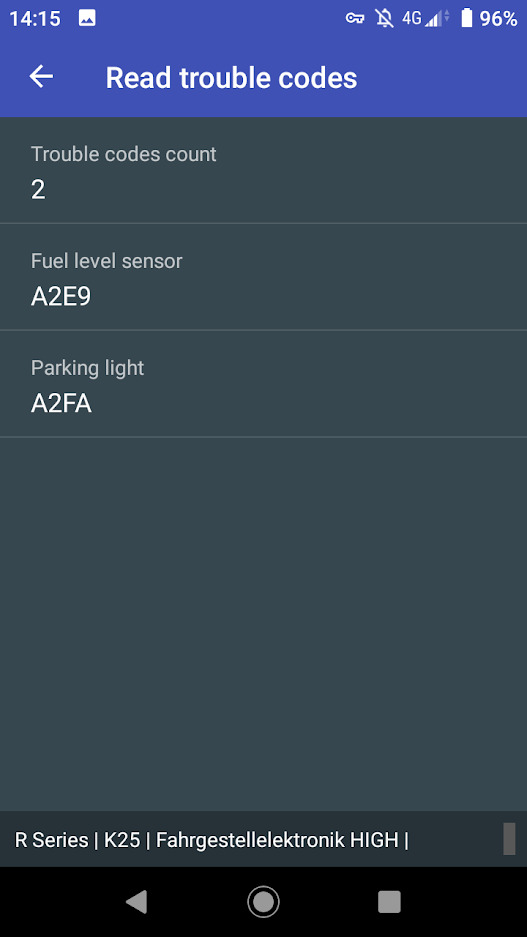
After changing the Thermocouple parameter to potentiometer I can see the ZFE has thrown a fuel level sensor error code , and the dash is now showing no fuel and is flashing a FUEL! warning.

I’ve run out of time this weekend so I’ve reset the parameter to foliengeber (which restored my dash to showing three quarters of a tank of fuel as before) and next step is to get to the float and see if it’s hooked up on something – if so hopefully that will get my fuel gauge working again (I still have the converter module fitted).
Just thought I’d post in case anyone has been through a similar situation and if so was it the float that was the problem?
This is what my dash looks like.
Before grappling with the float again I thought I’d fire up the Motoscan app and see what the settings looked like. Even though I have a 2010 GSA with trip computer I don’t see a parameter for INDUCTIVE_FUEL_SENSOR so I guess I have a different ZFE version to the bike Denz0 worked on, which probably means that Denz0’s hack wouldn’t work on my bike anyway? I can see Thermocouples FCS 08 was set to foliengeber so I set it to potentiometer to see what happened.
After changing the Thermocouple parameter to potentiometer I can see the ZFE has thrown a fuel level sensor error code , and the dash is now showing no fuel and is flashing a FUEL! warning.
I’ve run out of time this weekend so I’ve reset the parameter to foliengeber (which restored my dash to showing three quarters of a tank of fuel as before) and next step is to get to the float and see if it’s hooked up on something – if so hopefully that will get my fuel gauge working again (I still have the converter module fitted).
Just thought I’d post in case anyone has been through a similar situation and if so was it the float that was the problem?
Hi everyone with the same problem of the fuel strip.
I have a 2008 GSA.
I have managed to complete the conversion OK, using the MotoScan ultimate and their scantool (unicar).
Had trouble with the float initially as it must have got caught on something, but after freeing it up by putting some fuel in and lifting the pump and then reseting it.
All good, three blipps of fuel for about 8 litres and range showing at 147 miles.
Pin change fiddly to remove blanks, but all OK.
Can not believe BMW didn't know how to do this as soon as it became a problem.
Regards
Nige
I suspect by mounting the sending unit to the pump BMW were having difficulty getting the full range of movement of the float, which was needed to work with the computer, not just the level gauge.
Eventually in 2010 a genius or probably a team of geniuses at BMW realized they could get around this by re-siting the sender unit on to the filler neck to get the full range of movement of the sender.
It is easier to deny that there is a problem and carry on charging for new fuel strips.
Eventually in 2010 a genius or probably a team of geniuses at BMW realized they could get around this by re-siting the sender unit on to the filler neck to get the full range of movement of the sender.
It is easier to deny that there is a problem and carry on charging for new fuel strips.
MWH
Registered user
Anyone Edinburgh way have Motoscan? I've got a gs911 but they're not capable of this. I've got a convertor but it's a little hit n miss. I need to check it's not getting hooked up on the pipe, if it is I'm not sure how you stop it as when I fitted the float I could only push the pipe to the side so nothing to stop it bouncing back!
I suspect by mounting the sending unit to the pump BMW were having difficulty getting the full range of movement of the float, which was needed to work with the computer, not just the level gauge.
Eventually in 2010 a genius or probably a team of geniuses at BMW realized they could get around this by re-siting the sender unit on to the filler neck to get the full range of movement of the sender.
It is easier to deny that there is a problem and carry on charging for new fuel strips.
Slightly more complex than you think
Next time we meet i'll tell you over a pint
Slightly more complex than you think
Next time we meet i'll tell you over a pint
Having done the fuel strip to float conversion the Denz0 way I can`t see any reason why BMW could not do it but always willing to learn, especially if a pint is involved.
Next time we meet i'll tell you over a pint
That sounds like an excellent idea when this virus is out of the way and we are released back into the wild.
Fuel strip
Denzo,
Bloody good work.
Question:- does this conversion enable all the functions of the strip? I'm thinking specifically of the right/left side fuel transfer that the pump does using the fuel level.
I have a GS911 that apparently won't do the programming. IM in Zummerzet, can this be done off site after installation and is there someone willing to do it for me if I ride/bring the bike over? Beer will be involved...
Bikes an 07 plate GSA which I've had from new...
Fluff.
Might not work i'm afraidDenzo,
Bloody good work.
Question:- does this conversion enable all the functions of the strip? I'm thinking specifically of the right/left side fuel transfer that the pump does using the fuel level.
I have a GS911 that apparently won't do the programming. IM in Zummerzet, can this be done off site after installation and is there someone willing to do it for me if I ride/bring the bike over? Beer will be involved...
Bikes an 07 plate GSA which I've had from new...
Fluff.
the R1200gs Bikes from 12/02 - 10/07 (K25) with the type code 307 & 317 could be supplied either with float sensor or fuel strip
The trigger for which bikes got float( good) or strip (not good) was if the bike was specced with a trip / onboard computer option you got fuel strip
If the bike didn't have have the onboard computer specified , you got the pump / float unit
For the GSA (K25) 03/05 - 09/07 type code 0382 & 0397 the above also applies
For both varients GS & GSA from the model uplift in 2008 GS model codes 303 &313 GSA model codes 0380 & 0390 The only option was onboard computer so all fuel strips
From the model uplift in 2010 they went back to a float system
However there is overlap on the changes so bikes built / registered around model change dates may have one or the other system fitted
it is possible to change from strip to float, but it is also dependent if you have the right ZFE for the pin swap to be applied
The RT range does not have the right ZFE so can not be converted.
As an update to this
its all down to the ZFE - central ecu
Te ZFE come in 3 varients
Low
Basic
High
Depending on what options were specced depends somewhat on what pinning is in the ecu
The low zfe has pining for a float only - no onboard computer
The basic zfe i believe has pinning for the onboard computer but may not have pinning for the float system,
or if it does, the heater element which is used to calculate some of the onboard computer functions may not work, as it has been removed.
The high, i believe is the all singing dancing fully specced opttion
Fuel strip
OK. Just watched the Spanish vid. Looks straight forward enough. What differentiates the ECU types? How do I tell which one I have?
THanks
Fluff
OK. Just watched the Spanish vid. Looks straight forward enough. What differentiates the ECU types? How do I tell which one I have?
THanks
Fluff
MWH
Registered user
Does the GS911 not say what ZFE is fitted? Seem to recall on autoscan it tells you in the info.
On mine, the last bit of an autoscan is ZFE. Mine says high next to it, under it says ZFE type: High.
On mine, the last bit of an autoscan is ZFE. Mine says high next to it, under it says ZFE type: High.
Last edited:
Does the GS911 not say what ZFE is fitted? Seem to recall on autoscan it tells you in the info.
On mine, the last bit of an autoscan is ZFE. Mine says high next to it, under it says ZFE type: High.
There are 3 ZFE's
Low
Basic
High
The high has both sockets populated
The low only has the Left socket populated
I have no info for the basic
I have just sent Luke a load of info to to see if he can put together an definitive guide
The stumbling block is the ZFE
you need pins 21 & 37 for the ZFE to read the data from, instead of pins 34 35 & 38 39
according to the Haynes manual the RT does not have these pins,
The RT may also have the High ZFE?
Hello,
I´m new in this Forum, driving an R1200RT DOHC, BJ2010.
This model was equipped until august 2010 with the fuel strip, as mine is.
My fuel strip is failing, too, so I try to fix this in a final way.
I have read in #11 "there are no loose pins / connector 21 or 37 to connect to"
This applies perhaps to RT05, not to RT10-models.
My repair book shows like in #12 reported.
Also my MotoScanApp shows the option to switch from foil to float.
So I will look for a float sensor and try to get this work done.
I hope I can put across my matter of concern.
Gruss Frankie


Similar threads
- Replies
- 11
- Views
- 1,321
- Replies
- 17
- Views
- 794