Oil and Filter change step-by-step

Are the spark plug(s) easily accessible? I think I'd remove them before priming the oil circuit/emptying the oil tank with the starter button.
 
Are the spark plug(s) easily accessible? I think I'd remove them before priming the oil circuit/emptying the oil tank with the starter button.

About 2 hours to get at them..... every panel has to come off, then the entire airbox, then you need a thin walled, long spark plug spanner, whcih I don't possess. I take it to Foley's and get Andy to lend me his when I am at that stage. She has had one new set in her life, that was when I put diesel in last year! There is no fear of using the starter. Even if it starts there is oil in there for the pump to suck on. The time it takes, at idle, to hit the kill button is not going to do any damage whatsoever. it isn't like you are spinning it with no oil. How long it would take to suck the entire litre and a bit through I don't know, but a lot longer than a momentary fire up. To be honest, I have bever had it fire up because you can hear when she is about to and just take your finger off the button, that stops it.
 
I'm guessing previous owner has replaced sump plug and I now have an Allen key operated sump plug, assuming that's the one and not the 22mm bolt over a banjo fitting just to the LHS of what I think is the sump plug!
 
I'm guessing previous owner has replaced sump plug and I now have an Allen key operated sump plug, assuming that's the one and not the 22mm bolt over a banjo fitting just to the LHS of what I think is the sump plug!

There's a low profile sump plug with hex key.
 
There's a low profile sump plug with hex key.

I have replaced mine with an aftermarket 24mm sump plug that utilises a socket - wall drive socket at that!

The 8mm Allen key is the normal sump plug. BBB888 - do you still have the original plastic sump guard? Is there a hole in it that the sump plug can be accessed through? The metal Challenge sump guard is a popular mod, I can't remember if it does or not, the Schefflemeir one I have on the Challenge does. A hole saw is your friend if you can't access it without removing the plate.
 
Yes I still have the original black rubbery plastic sump guard. Sump plug looks to be an aftermarket shiny stainless plug with a magnet (fortunately not covered in gremlins). Takes the biggest Allen key in my set. No idea how to torque it up as I haven't got a socket type Allen key. So I am just doing it 'medium' tight by hand (I reserve full tight for rear axle).
Anyway, so far so good. I left draining oil last night and will refit and start adding fresh oil this evening.
I have also stripped off the air box and have one detached breather pipe front RHS and might be missing a breather pipe on LHS - don't know if the probe like thing sticking out from bottom of air box (and looks same as the one on RHS which has breather) should have a breather or not.
Front RHS in bottom half of airbox has a plastic partition just back from front of air box on RHS to create a small almost rectangular compartment which has some coarse foam mesh stacked into it - 2 pieces. No idea what for.
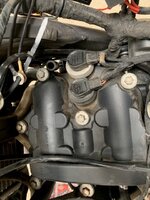
Plan to clean up idle vale thingy and throttle body and then reinstall airbox etc. New oil, filter (and air filter). Plugs if I can work out how to remove stick coils without the BMW removal tool, without damaging anything. Scottoiler not working and the vacuum cable pipe goes to inlet below throttle body, so not sure how I get to it without lots more stripping which I am reluctant to do - strip so far has already tested my spannering ability!
 

Attachments

  • 1st service 14.04.23.jpg
    1st service 14.04.23.jpg
    137 KB · Views: 108
The coil/plug cap just pulls off. If it is tight get a screwdriver under the ridges each side. I put a drop of oil on the rubbers when put them back - I mean a very light smear not enough to have any run off. Once that is off you will need a long reach, thin walled plug spanner. I don't have one and take it to Andy who has! I must get one but the plugs last many thousands of miles in my experience, but then I am very easy on the throttle and cruise gently, although I did see 103mph on the speedo once on a long flat stretch. I don't think she has been above 80 ever since, I have no need.
 
Thanks KR. I'll have a go at the coil caps tonight.
In the meantime please see photo of underside of airbox - front far right (or lower in photo) is the plug for the hose, just not sure of the other plug point should have a hose attached as well (cant find a hose anywhere in the vicinity on the bike).
Also attached a photo of the underseat and I think the large ring is the one you said should spin off and reveal the fuel filter below? The smaller hexagonal cover is I think for the fuel pump.
Other photo inside the airbox shows the coarse foam in the right hand rear corner. The cam cover shot shows the hose that fits to the rhs side plug on underside of airbox.
Quite enjoying this home spannering but keen not to cock it up!
 

Attachments

  • Bottom Airbox.jpg
    Bottom Airbox.jpg
    85.5 KB · Views: 97
  • Inside Airbox.jpg
    Inside Airbox.jpg
    101.2 KB · Views: 98
  • Under seat fuel.jpg
    Under seat fuel.jpg
    99.1 KB · Views: 98
  • Cam Cover.jpg
    Cam Cover.jpg
    100.5 KB · Views: 98
hi a few thoughts,
please don't mix the coils up, if the wrong coil gets stuck on the wrong plug, the twin spark timing will cause problems because the the main plug get switched off iso the secondary plug.
To get them out use cable ties, and make sure there is no dirt in the plug chamber recess.
The auxiliary plug has a white cable and it's the right hand side plug.
The fuel filter and pump are under the ring, the hex is for the fuel return.
The breather pipe is on the right hand side under the oily sponge in the air filter housing,
On the leftside is the pipe to let water out of the housing.
 
Thanks Drimcong. All clear on airbox outlets and what I need to remove to access fuel filter, and I'll put the coils back exactly as the picture - assuming I can get them out OK. Much appreciated advice for a novice home mechanic.
PS. Does the breather pipe for airbox just push fit or is it missing a clamp?
 
Fuel filter change today - thanks KingRat for your guide. Old filter Made in Austria and dated 29/09/06. New one undated and Made in Germany. Fuel pipe is 10.5mm and i used Jubilee clip. Now just the plugs to change before starting to put it all back together.
 
Fuel filter change today - thanks KingRat for your guide. Old filter Made in Austria and dated 29/09/06. New one undated and Made in Germany. Fuel pipe is 10.5mm and i used Jubilee clip. Now just the plugs to change before starting to put it all back together.

Excellent news. You should be out annoying the neighbourhood soon!
 
Well hopefully later this week......all going back together but I have a series of tacky connections at the battery - heated grips, USB charger, and a random cable which I found under the seat and looks like its been close to something hot. Its a single pin which I think mus be for a specific accessory =or to charge something so I am removing it. Will tidy up the battery connections and replace a few ring eyelets and then I can complete the oil fill to level - 30 secs run then top up then on until fan kicks in and then check.
Incidentally having filled the oil tank last week it took about 1.6 litres. Checked it yesterday and level had gone down so I added 300ml. So should take another 300/400ml once its all up to temp. We'll see. I drained oil on sidestand and left it for 48 hrs but reckon there may have been some old oil left in the darkest recesses on the left hand side of cases. Next time i think Ill jack her up so I can drain all from all sides.
 

Attachments

  • Random cable.jpg
    Random cable.jpg
    47.6 KB · Views: 44
Ah, thanks I think that's right. Heated clothing and heated grips! Well it must have got hot! Bike was in Shetland at some point according to paperwork so probably needed up there. I am fair weather.
 
Please take it handy with the oil; 2.1 litre is nearly too much, when not all oil was drained. there are also 2 different dip sticks in play. The check procedure is also not easy, i.e. heat up the machine until the fan comes on, then wait for a minute before measuring on a level sitting bike, not on the stand.
If you have too much oil in the system, it's back to cleaning the airfilter housing, and the airfilter might be messed up too.
 
Fired her up for 30 secs. Checked oil and added in 100ml doses. Then ran till fan came on, left a few mins and then checked and its spot on the line on the dipstick and exactly 2.3 litres in.
Think next job is new chain and sprockets (sprockets look ok but something tells me its a false economy not to do sprockets at same time). Scottoiler fitted but looks like hasn't been working for a while and chain a bit rusty.


Back
Top Bottom